Introduction to Cardboard Crafting
Cardboard crafting offers endless opportunities for creativity and resourcefulness. How to make a doll house out of cardboard? It’s a form of DIY that taps into the potential of recyclable materials to create something new and beautiful. Whether it’s for play or decoration, cardboard can be transformed with simple tools and a sprinkle of imagination. This craft is ideal for families looking to engage in eco-friendly activities, as well as for anyone who enjoys a hands-on approach to making toys and decorative items.
Building a dollhouse out of cardboard isn’t just an entertaining project; it teaches valuable skills too. You’ll learn basic construction techniques, how to plan and execute a design, and even some interior decorating. Moreover, this kind of crafting nurtures problem-solving skills as you figure out how to turn flat cardboard into a three-dimensional structure. Plus, it’s a great way to bond with children, guiding them through the crafting process and watching their ideas come to life.
To embark on this cardboard dollhouse journey, we will gather materials, most of which can be found around the home or sourced from recycling bins. Then, we’ll sketch out a layout and begin the construction process, ensuring the foundation is sturdy before moving on to the more intricate details of design. By the time you’ve finished, you’ll have not only crafted a unique dollhouse but also taken an active step in reducing waste and recycling materials. Let’s roll up our sleeves and dive into the world of cardboard crafting!
Gathering Your Materials
How to make a doll house out of cardboard? Gearing up to build a cardboard dollhouse necessitates gathering certain basic supplies. Let’s collect what’s needed to start our eco-friendly creation.
Essential Items for Your Dollhouse
To embark on this project, you’ll require:
- Sturdy cardboard:
- Consider using boxes of various sizes, as they provide a solid foundation for your dollhouse project.
- The durability of cardboard allows it to withstand manipulation and can support structural features you want to create, such as walls and floors.
- A sharp cutter:
- A sharp cutter is essential for making precise and clean cuts when you’re creating windows and doors in your dollhouse.
- Precision is important to ensure that the openings are uniform and fit well, contributing to the overall aesthetics of your creation.
- Glue and tape:
- Strong adhesive glue and tape are necessary to securely hold the individual pieces of the dollhouse together.
- Choose options that dry clear for a neat finish, and consider different types of glue for various materials, ensuring a stable and durable construction.
- Scissors:
- A good pair of scissors will help you easily cut through paper and fabric, which are often used for interior decorations and furnishings.
- This tool is essential for creating detailed elements such as curtains, rugs, and furniture coverings.
- Ruler and pencil:
- Utilizing a ruler and pencil will help you measure and mark accurately for all cuts and placements, ensuring that everything fits properly.
- Taking the time to measure can prevent mistakes and provide a more professional look to the completed dollhouse.
- Paints and brushes:
- Incorporating paints and brushes allows you to add vibrant colors and unique designs to your dollhouse, enhancing its visual appeal.
- Experiment with different finishes and textures to bring your dollhouse to life and reflect your personal style.
- Fabric and wrapping paper:
- These materials can be creatively used for wallpaper and other decorative elements, allowing for customization of each room.
- Choose patterns and colors that suit the theme of your dollhouse, contributing to a cohesive and inviting atmosphere.
Where to Find Materials
Many required items are likely at hand in your home. Old packaging and delivery boxes are perfect. Look around for disposable items that can transform into dollhouse decor.
Remember, this is a chance to reuse and recycle. So, before purchasing new materials, consider how you might repurpose items you already own. This approach not only saves money but also aligns with eco-conscious goals. With your materials ready, the next step is planning your dollhouse design to bring it to life.
Planning Your Dollhouse Layout
How to make a doll house out of cardboard? Start by sketching your ideas for the dollhouse. Draw the number of floors and rooms you want. Consider how you’ll play with it. Will it open from the front, sides, or have a removable roof?
Measure available cardboard to fit your design. Choose a large box for the main structure. Use smaller boxes for additional floors or rooms. Think about room dividers and stairs too.
Decide on the scale. Dolls and furniture need to fit comfortably. Use a ruler for accurate measurements.
Create a detailed plan on paper. Mark where to cut windows and doors. Plan which rooms will go where. Choose spots for special features like a fireplace or balcony.
With a solid plan, you’ll be set for smooth construction.
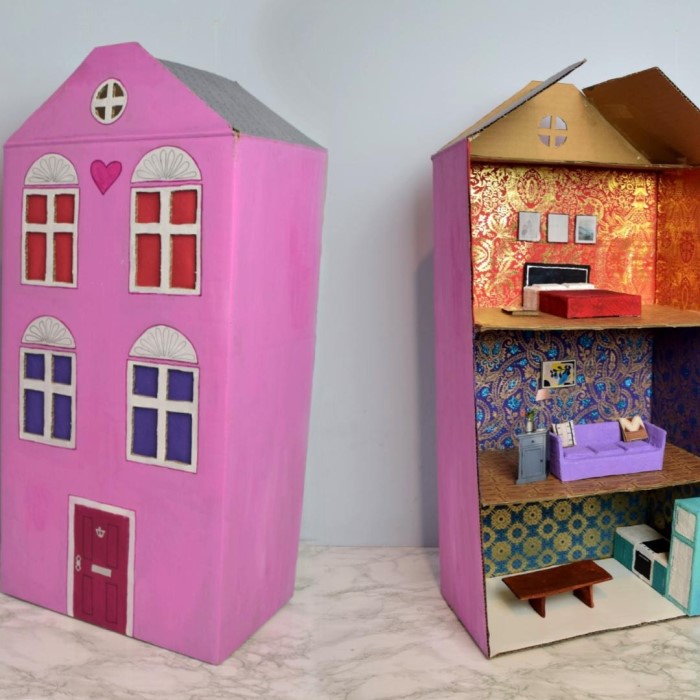
Constructing the Dollhouse Frame
How to make a doll house out of cardboard? Creating the frame of your cardboard dollhouse is a fundamental step in your project. Start with the largest box, which will serve as the main body of the house. Cut off flaps or sections you don’t need with a sharp cutter; be careful and precise. Then, reinforce the box’s edges with tape to ensure stability for your structure.
For multi-floor houses, determine where each floor will be. Cut smaller cardboard pieces to create floor dividers, and affix them inside your box with glue or tape. Ensure these are level and secure, to hold up against play.
Next, sketch out the positions for windows and doors on the cardboard. Use your ruler and pencil for accurate lines. With your cutter, cut out these parts. Remember to keep some edges uncut if doors should open.
If your dollhouse design includes stairs or additional rooms, now is the time to add them. Use thinner cardboard pieces for easier bending and shaping. Glue these additional features in place, checking that everything fits nicely.
The frame construction sets the stage for adding personality with interior decorating, so take your time. Double-check measurements and structure integrity before moving on. Once the frame is complete, the real transformation begins with decoration and detail work.
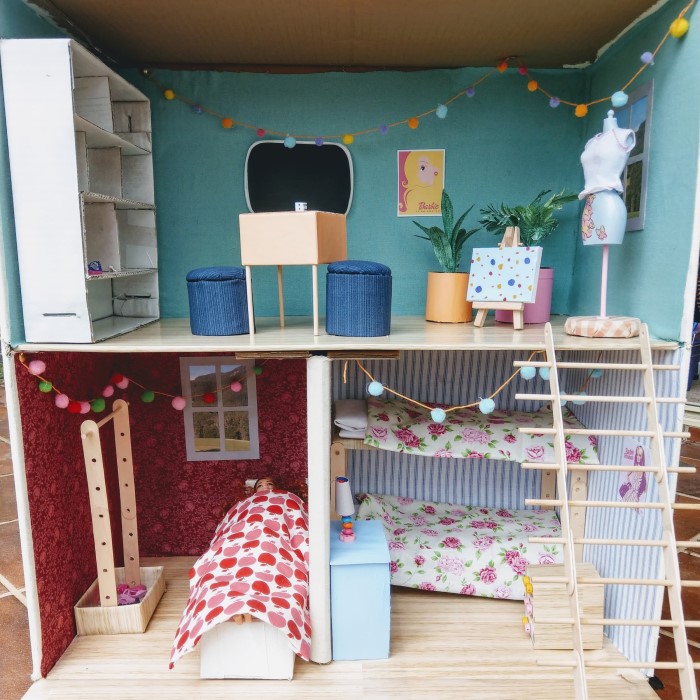
Decorating the Interior
Transforming the interior of your cardboard dollhouse infuses life and character into your creation. Let’s make your dollhouse cozy and inviting.
Choosing Decorative Elements
Pick colors and patterns that light up the rooms. Use fabric scraps for carpets or wallpapers. Paint can liven up walls.
Applying Wallpaper
Cut pieces of wrapping paper to fit each wall. With glue, stick them smoothly. Pick fun designs for a playful look.
Painting Walls
Opt for acrylic paints—they dry fast and don’t warp cardboard. Bright colors make rooms cheerful.
Adding Details
Magazine cutouts can become pictures or rugs. Simple drawings on walls can represent fireplaces or shelves.
Crafting Furniture
Use bottle caps for tables, beads for doorknobs. Make chairs from small boxes. Let your imagination guide you.
Remember, little touches make big impacts. Your dollhouse’s interior should reflect creativity and resourcefulness. With each addition, see your house become more of a home.
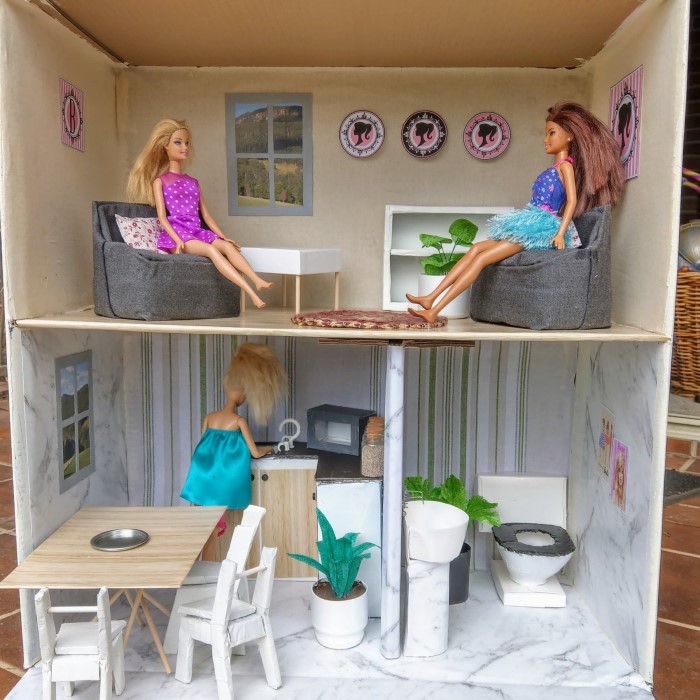
Installing Floors and Dividers
How to make a doll house out of cardboard? Installing floors and dividers gives your dollhouse structure and privacy for each space. Follow these steps to add these functional features.
Determining Floor Placement
Decide where each floor will go. Think how many you want and how they divide the house. Ensure your dollhouse structure can support the floors.
Cutting and Installing Dividers
Measure and cut cardboard for dividers. Use a ruler for straight edges. Secure dividers in place with glue or tape. Check they fit snugly and are upright.
Stabilizing Floors
Create supports for your floors if needed. Small cardboard strips can work well. Attach them where floors meet walls. This makes for a stronger structure.
Adding Variety with Dividers
Consider open-plan areas or rooms. Change divider placements for different designs. Play with ideas to find the best layout. Use your creativity to personalize.
Checking Stability
Push lightly on floors and dividers. They should not move or wobble. If they do, add more support. This ensures your dollhouse is sturdy and safe.
In this phase, your dollhouse takes shape. Each floor and room starts to promise fun and imaginative play. With the basic structure defined, doors and windows are up next.
Making Doors and Windows
How to make a doll house out of cardboard? Creating doors and windows adds realism and practicality to your cardboard dollhouse.
Crafting the Doors
To make doors, choose where they should go and draw their shape on the cardboard. Use a cutter for clean edges, cutting on three sides and leaving one side attached to swing the door. You can glue a small bead as a doorknob or paint one on.
Designing the Windows
Windows can be simple rectangles or more detailed with crossbars. Outline the desired shape on the cardboard, and carefully cut it out. Remember to cut cleanly to maintain the appearance and structure.
By including doors that open and aesthetically pleasing windows, your dollhouse will look more inviting and interactive. This step really brings your dollhouse to life, making it not just a structure, but a home for imagination.
Creating Dollhouse Furniture
After constructing the dollhouse frame, the next creative step is to craft furniture.
Designing Furniture Pieces
Start by visualizing each piece. What furniture does your house need? Tables, chairs, beds, and maybe a little patio set are all options. Use small cardboard pieces and scraps from your project.
Simple Furniture Creation Techniques
- Tables: Use bottle caps for the base and cardboard for tops.
- Chairs: Fold cardboard into shape, reinforce with tape.
- Beds: Small boxes can serve as the base. Add fabric scraps for bedding.
Customizing Your Furnishings
Paint your furniture to match the room themes. Use beads as doorknobs or decorative elements. Adding stickers can simulate drawers or intricate designs.
By creating your own dollhouse furniture, you’re not only recycling but also adding personal touches that make it truly unique.
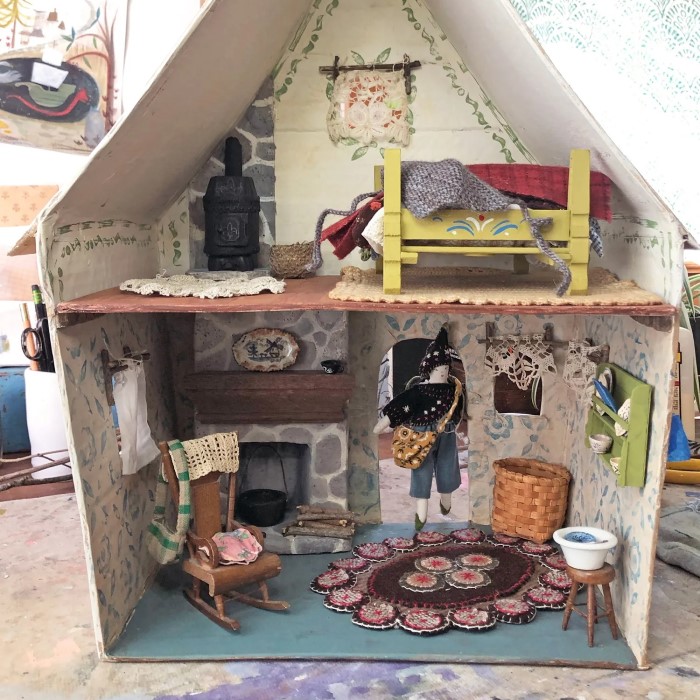
Adding the Finishing Touches
Now, it’s time for the fun part—adding those final touches that make your cardboard dollhouse feel like a real home.
Bringing Rooms to Life
Add small details to each room. Think curtains from fabric scraps or tiny cushions. Use paper to craft art for the walls. These pieces give your rooms personality.
Exterior Design
Don’t forget the outside. Paint the exterior or apply paper to mimic siding. Add windowsills, a mailbox, or a crafted doorbell.
Roof and Chimney
The roof can have hand-drawn tiles or layered cardboard shingles. A chimney, cut from a small box, adds charm.
Landscaping
Create a garden with green paper or fabric. Craft a path with pebbles or painted cardboard.
Play Pieces
Make trees from rolled paper. Cars or animals from small boxes add fun. This lets kids dive into imaginative play.
Durability Checks
Before play starts, go over the dollhouse. Check for loose parts. Secure anything that might need extra glue or tape.
Reusable Elements
Build furniture in a way that allows for changes. Velcro or double-sided tape can let kids rearrange easily.
Eco-Friendly Tips
Use natural materials where possible. Avoid plastic. Teach kids how every piece has a recycling story.
With these finishing touches, your cardboard dollhouse becomes more than a toy. It’s a creative adventure, a lesson in recycling and a source of pride for every builder and player. Now, step back and appreciate your handcrafted masterpiece!
Upcycling and Environmental Benefits
Upcycling is a creative way to reduce waste. It involves turning old items into new treasures. When crafting a cardboard dollhouse, we embrace this eco-friendly practice. Here’s how our project supports the environment:
Reducing Waste
Crafting with cardboard means less trash in landfills. We use boxes that would otherwise be discarded. Every cut and fold transforms waste into something special.
Teaching Sustainability
This dollhouse project is a lesson in sustainability. Kids learn the value of reusing materials. They see firsthand how to make beautiful things without harming the planet.
Saving Resources
By upcycling, we save on resources. No need for new materials when old ones work perfectly. It’s a smart way to conserve and be resourceful.
Encouraging Creativity
Upcycling sparks imagination. Turning a plain box into a dollhouse requires creativity. This process can inspire more upcycled creations.
Minimizing Pollution
Creating from recycled materials lessens pollution. Manufacturing new items often leads to more emissions. By upcycling, we keep the air cleaner.
Through upcycling, our cardboard dollhouse project benefits the environment. We reduce waste and learn to value sustainability. Plus, we get a unique toy without extra pollution. It’s a win-win for everyone and the Earth.
Conclusion
In conclusion, learning how to make a doll house out of cardboard is an enriching experience filled with creativity and fun. By following the steps outlined in this guide, you will create a unique masterpiece that invites play and imaginative storytelling. So gather your materials, unleash your creativity, and enjoy a rewarding building process that will culminate in a wonderful doll house for dolls or action figures to enjoy for years to come. Happy crafting!